本文将介绍在本地搭建 Hugo 并通过Nginx 和 服务器部署 Hugo 的方法。以下所叙之方法就是我在部署本站点时所使用的,防止自己以后忘记。如果对您有借鉴作用,或有问题欢迎留言。
在部署 Hugo 之前,需要进行的准备:
1.购买一个服务器(可以看看阿里云,腾讯云的学生优惠)
2.租一个域名
3.下载一个文本编辑器,方便后续写md文件,推荐:vscode
自动化脚本
安装Nginx
1
2
| sudo apt update
sudo apt install nginx -y
|
检查是否正常运行
1
| sudo systemctl status nginx
|
设置开机自启
1
| sudo systemctl enable nginx
|
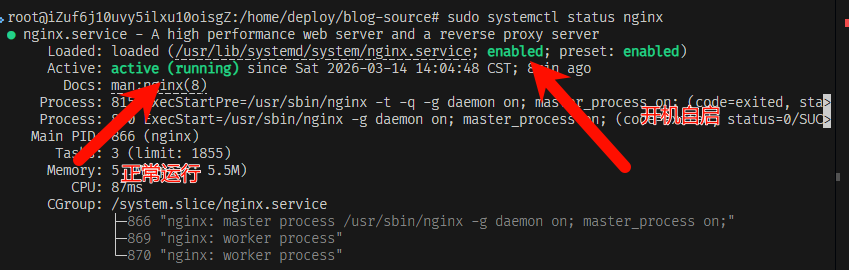
查看是否成功
1
| sudo systemctl status nginx
|
如果遇到Nginx启动问题
1
2
| sudo systemctl start nginx # 启动
sudo systemctl reload nginx # 重启
|
创建博客发布根目录
1
2
3
4
5
6
7
8
9
| # 创建网站根目录
sudo mkdir -p /var/www/blog
# 创建 deploy 用户专门用于部署
sudo adduser deploy
sudo usermod -aG sudo deploy
# 让 deploy 用户拥有网站目录权限
sudo chown -R deploy:deploy /var/www/blog
|
安装Hugo
先切换到deploy用户身份
1
2
| su deploy
sudo apt install hugo -y # 安装 Hugo Extended
|
初始化博客
1
2
3
| su - deploy
hugo new site ~/blog-source
cd ~/blog-source
|
完成后会出现以下文件

deploy 用户将来用来自动部署 Hugo 生成的文件。
运行
可以查看静态网页,地址通常是 localhost:1313 。如果页面显示“Page not found”,说明此前的所有配置都是正常无误的。
配置主题
Hugo 默认是没有主题的,需要到 官网 去下载主题。我使用的主题是 Jimmy Cai 创作的 Stack 主题。接下来的部分内容会以此主题为例。
将主题下载完成后并解压至 themes 文件夹中,将 demo 文件夹中的 content 和 hugo.yaml 复制到主文件夹中,并删掉原来的 hugo.toml 和 Content/post/rich-content,避免出现不兼容的错误。
注:下载下来的主题会带版本号,如我的是 hugo-theme-stack-3.34.2,删除版本号,只留下 hugo-theme-stack
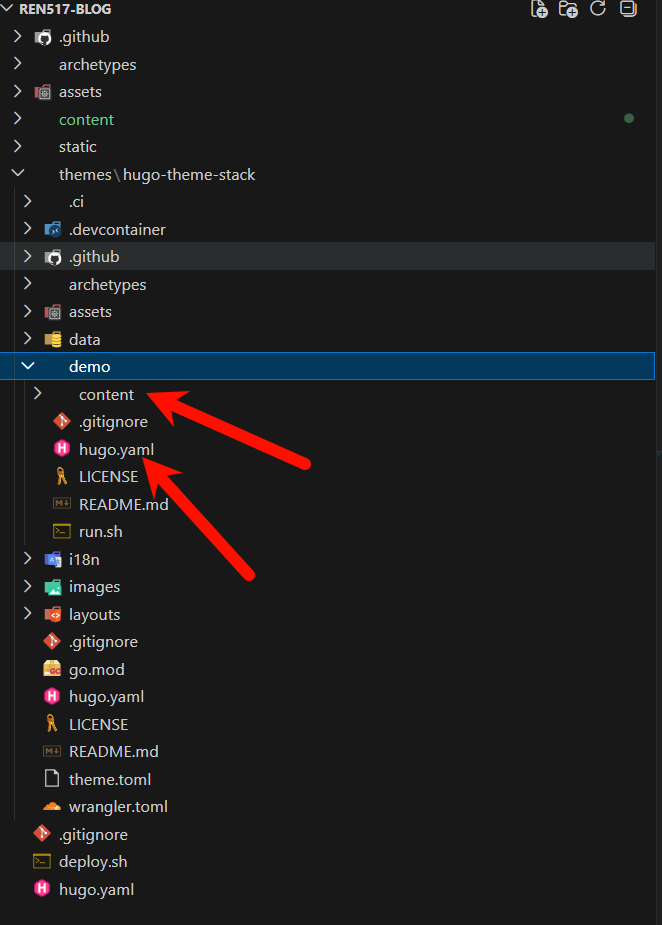
修改 hugo.yaml 中的 theme 选项,将其修改为与主题文件夹同名。
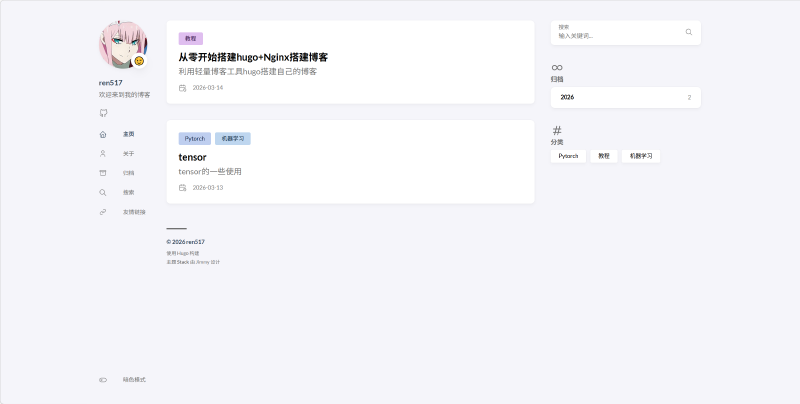
再次在命令行输入 hugo server -D 启动服务,若此时能看见类似下图的样式,说明此前操作无误。
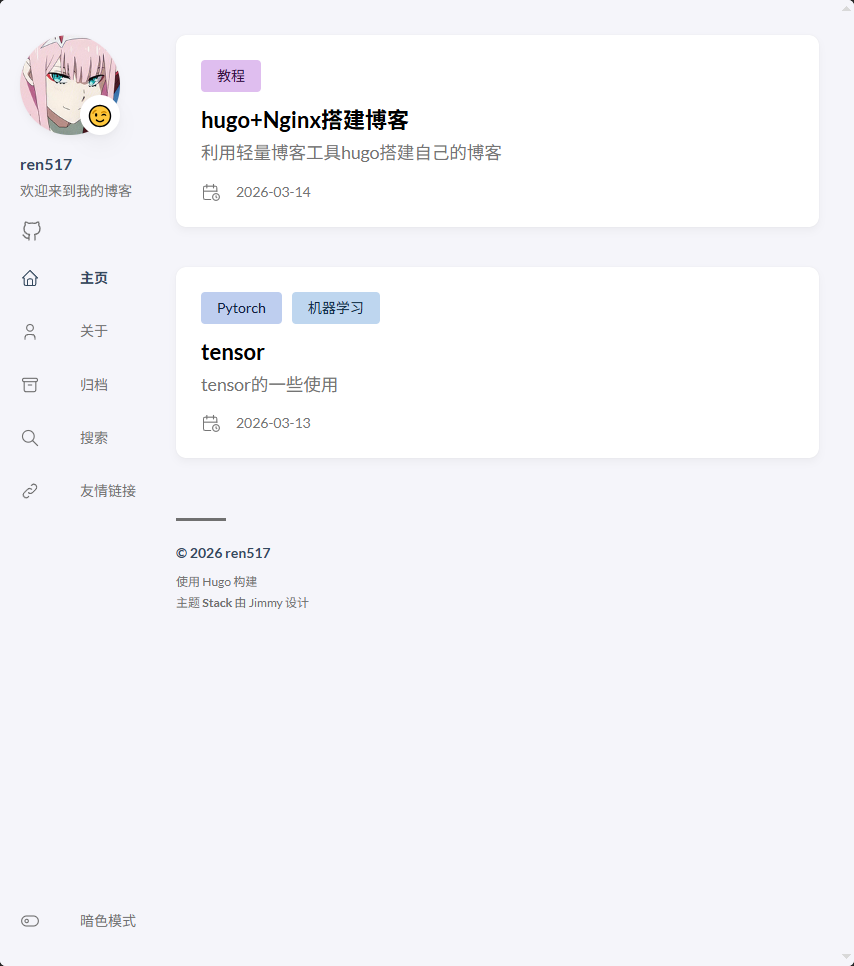
看到类似的效果就可以了,我这个是后面还改了一些配置
在 config.yaml 中输入相关配置。文件各项配置解释如下,用作参考:
  1
  2
  3
  4
  5
  6
  7
  8
  9
 10
 11
 12
 13
 14
 15
 16
 17
 18
 19
 20
 21
 22
 23
 24
 25
 26
 27
 28
 29
 30
 31
 32
 33
 34
 35
 36
 37
 38
 39
 40
 41
 42
 43
 44
 45
 46
 47
 48
 49
 50
 51
 52
 53
 54
 55
 56
 57
 58
 59
 60
 61
 62
 63
 64
 65
 66
 67
 68
 69
 70
 71
 72
 73
 74
 75
 76
 77
 78
 79
 80
 81
 82
 83
 84
 85
 86
 87
 88
 89
 90
 91
 92
 93
 94
 95
 96
 97
 98
 99
100
101
102
103
104
105
106
107
108
109
110
111
112
113
114
115
116
117
118
119
120
121
122
123
124
125
126
127
128
129
130
131
132
133
134
135
136
137
138
139
140
141
142
143
144
145
146
147
148
149
150
151
152
153
154
155
156
157
158
159
160
161
162
163
164
165
166
167
168
169
170
171
172
173
174
175
176
177
178
179
180
181
182
183
184
185
186
187
188
189
190
191
192
193
194
195
196
197
198
199
200
201
202
203
204
205
206
207
208
209
210
211
212
213
214
215
216
217
218
219
220
221
222
223
224
225
226
227
228
229
230
231
232
233
234
235
236
237
238
239
240
241
242
243
244
245
246
247
248
249
250
251
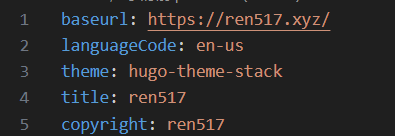
| baseurl: https://example.com # 网站的基本 URL 。替换为你自己的网站域名。
languageCode: en-us # 网站的默认语言代码,zh-cn 指中文简体。
theme: hugo-theme-stack # 使用的 Hugo 主题,这里是 Stack 主题。
paginate: 3 # 每页显示的内容数量,通常用于分页设置。
title: Example Site # 网站的标题,会显示在浏览器标签上。
copyright: Example Person # 网站的版权信息,通常显示在页面底部。
# Theme i18n support
# Available values: ar, bn, ca, de, el, en, es, fr, hu, id, it, ja, ko, nl, pt-br, th, uk, zh-cn, zh-hk, zh-tw
DefaultContentLanguage: en # 设置网站的默认内容语言。可选值见上注释。
# Set hasCJKLanguage to true if DefaultContentLanguage is in [zh-cn ja ko]
# This will make .Summary and .WordCount behave correctly for CJK languages.
hasCJKLanguage: false # 如果默认语言是中文、日文或韩文,设置为 true 以确保摘要和字数统计正确。
languages:
en:
languageName: English # 英语语言配置
title: Example Site # 英文站点标题
weight: 1 # 语言权重,数值越小排序越靠前
params:
description: Example description # 英文站点描述
zh-cn:
languageName: 中文 # 中文语言配置
title: 演示站点 # 中文站点标题
weight: 2 # 中文站点语言权重
params:
description: 演示说明 # 中文站点描述
ar:
languageName: عربي # 阿拉伯语配置
languagedirection: rtl # 文字方向,从右到左
title: موقع تجريبي # 阿拉伯语站点标题
weight: 3 # 阿拉伯语站点语言权重
params:
description: وصف تجريبي # 阿拉伯语站点描述
services:
# Change it to your Disqus shortname before using
disqus:
shortname: "hugo-theme-stack" # Disqus 评论系统的短名称,需替换为你自己的 Disqus 短名称。
# GA Tracking ID
googleAnalytics:
id: # Google Analytics 追踪 ID,用于网站流量统计。
permalinks:
post: /p/:slug/ # 博客文章的永久链接格式,使用文章的 slug 作为路径。
page: /:slug/ # 页面内容的永久链接格式。
params:
mainSections:
- post # 主内容区域,显示文章内容。
featuredImageField: image # 特色图片字段的名称。
rssFullContent: true # RSS 提要是否包含全文内容。
favicon: # e.g.: favicon placed in `static/favicon.ico` of your site folder, then set this field to `/favicon.ico` (`/` is necessary)
# 网站的favicon路径,例如`/favicon.ico`。
footer:
since: 2020 # 网站创建年份,通常显示在页脚。
customText: # 自定义页脚文本。
dateFormat:
published: Jan 02, 2006 # 发布日期格式。
lastUpdated: Jan 02, 2006 15:04 MST # 最后更新日期格式。
sidebar:
emoji: 🍥 # 侧边栏标题旁显示的 emoji。
subtitle: Lorem ipsum dolor sit amet, consectetur adipiscing elit. # 侧边栏的副标题。
avatar:
enabled: true # 是否启用头像显示。
local: true # 是否使用本地头像。
src: img/avatar.png # 头像图片路径。
article:
math: false # 是否支持数学公式渲染。
toc: true # 是否显示文章目录。
readingTime: true # 是否显示预计阅读时间。
license:
enabled: true # 是否启用文章版权信息。
default: Licensed under CC BY-NC-SA 4.0 # 默认版权协议。
comments:
enabled: true # 是否启用评论功能。
provider: disqus # 选择的评论提供商,默认为 Disqus。
disqusjs:
shortname: # DisqusJS 的短名称。
apiUrl: # DisqusJS 的 API URL。
apiKey: # DisqusJS 的 API Key。
admin: # DisqusJS 的管理员用户名。
adminLabel: # DisqusJS 管理员标签。
utterances:
repo: # Utterances 评论系统的 GitHub 仓库地址。
issueTerm: pathname # Utterances 评论系统的议题关联方式,使用页面路径。
label: # Utterances 评论系统的标签。
beaudar:
repo: # Beaudar 评论系统的 GitHub 仓库地址。
issueTerm: pathname # Beaudar 评论系统的议题关联方式。
label: # Beaudar 评论系统的标签。
theme: # Beaudar 评论系统的主题。
remark42:
host: # Remark42 的主机地址。
site: # Remark42 的站点标识符。
locale: # Remark42 的语言设置。
vssue:
platform: # Vssue 使用的平台(例如 GitHub)。
owner: # Vssue 评论仓库的所有者。
repo: # Vssue 评论的 GitHub 仓库地址。
clientId: # Vssue 的 OAuth 应用 Client ID。
clientSecret: # Vssue 的 OAuth 应用 Client Secret。
autoCreateIssue: false # 是否自动创建评论议题。
waline:
serverURL: # Waline 评论系统的服务器 URL。
lang: # Waline 的语言设置。
pageview: # 是否启用页面浏览统计。
emoji: # Waline 的 Emoji 表情包地址。
- https://unpkg.com/@waline/emojis@1.0.1/weibo
requiredMeta:
- name # 评论时需要填写的字段,用户名。
- email # 评论时需要填写的字段,电子邮件地址。
- url # 评论时需要填写的字段,网址。
locale:
admin: Admin # Waline 评论系统的管理员名称。
placeholder: # Waline 评论框的占位符文本。
twikoo:
envId: # Twikoo 评论系统的环境 ID。
region: # Twikoo 评论系统的部署区域。
path: # Twikoo 评论系统的路径。
lang: # Twikoo 评论系统的语言设置。
cactus:
defaultHomeserverUrl: "https://matrix.cactus.chat:8448" # Cactus.Chat 的默认主服务器 URL。
serverName: "cactus.chat" # Cactus.Chat 的服务器名称。
siteName: "" # You must insert a unique identifier here matching the one you registered (See https://cactus.chat/docs/getting-started/quick-start/#register-your-site)
# Cactus.Chat 的站点名称,需与注册的标识符匹配。
giscus:
repo: # Giscus 评论系统的 GitHub 仓库地址。
repoID: # Giscus 仓库的唯一标识符。
category: # Giscus 的分类名称。
categoryID: # Giscus 分类的唯一标识符。
mapping: # Giscus 的议题关联方式。
lightTheme: # Giscus 的浅色主题设置。
darkTheme: # Giscus 的深色主题设置。
reactionsEnabled: 1 # 是否启用 Giscus 的反应功能。
emitMetadata: 0 # 是否启用 Giscus 的元数据发射功能。
gitalk:
owner: # Gitalk 评论系统的仓库所有者。
admin: # Gitalk 评论系统的管理员用户名。
repo: # Gitalk 评论的 GitHub 仓库地址。
clientID: # Gitalk 的 OAuth 应用 Client ID。
clientSecret: # Gitalk 的 OAuth 应用 Client Secret。
cusdis:
host: # Cusdis 评论系统的主机地址。
id: # Cusdis 的站点标识符。
widgets:
homepage:
- type: search # 首页的小部件,搜索功能。
- type: archives # 首页的小部件,文章归档。
params:
limit: 5 # 显示的归档文章数量。
- type: categories # 首页的小部件,文章分类。
params:
limit: 10 # 显示的分类数量。
- type: tag-cloud # 首页的小部件,标签云。
params:
limit: 10 # 显示的标签数量。
page:
- type: toc # 页面的小部件,显示文章目录。
opengraph:
twitter:
# Your Twitter username
site: # 你的 Twitter 用户名,将在 OpenGraph 元数据中使用。
# Available values: summary, summary_large_image
card: summary_large_image # Twitter 卡片类型。可以选择 `summary` 或 `summary_large_image`,后者显示大图。
defaultImage:
opengraph:
enabled: false # 是否为没有特色图片的页面启用默认 OpenGraph 图片。
local: false # 是否使用本地图片作为 OpenGraph 图片。
src: # 默认 OpenGraph 图片的路径。
colorScheme:
# Display toggle
toggle: true # 是否在页面上显示颜色模式切换按钮。
# Available values: auto, light, dark
default: auto # 默认的颜色模式。可以选择自动切换(auto),或固定为亮色(light)或暗色(dark)。
imageProcessing:
cover:
enabled: true # 是否为封面图片启用自动处理功能,例如裁剪、缩放等。
content:
enabled: true # 是否为内容图片启用自动处理功能。
### Custom menu
### See https://stack.jimmycai.com/config/menu
### To remove about, archive and search page menu item, remove `menu` field from their FrontMatter
menu:
main: [] # 自定义主菜单的配置,可以在这里添加导航链接。
social:
- identifier: GitHub # 社交链接的标识符,通常用于指定图标。
name: GitHub # 链接的显示名称。
url: https://GitHub.com/CaiJimmy/hugo-theme-stack # GitHub 个人主页的链接。
params:
icon: brand-GitHub # 使用的社交图标,这里是 GitHub 图标。
- identifier: twitter # 另一个社交链接配置,这里是 Twitter。
name: Twitter # Twitter 链接的显示名称。
url: https://twitter.com # Twitter 的链接。
params:
icon: brand-twitter # 使用的社交图标,这里是 Twitter 图标。
related:
includeNewer: true # 是否在相关文章中包含较新的文章。
threshold: 60 # 相关文章匹配的相似度阈值,范围是0到100。
toLower: false # 是否将标签和分类转换为小写。
indices:
- name: tags # 使用标签作为相关文章的匹配依据。
weight: 100 # 标签匹配的权重值。
- name: categories # 使用分类作为相关文章的匹配依据。
weight: 200 # 分类匹配的权重值。
markup:
goldmark:
renderer:
## Set to true if you have HTML content inside Markdown
unsafe: true # 如果 Markdown 中包含 HTML 内容,设置为 true 以允许渲染这些 HTML。
tableOfContents:
endLevel: 4 # 目录生成时的最大标题级别。
ordered: true # 目录项是否使用有序列表。
startLevel: 2 # 目录生成时的起始标题级别。
highlight:
noClasses: false # 语法高亮时是否禁用 CSS 类名。
codeFences: true # 是否启用代码块语法高亮。
guessSyntax: true # 是否自动猜测代码块的语言进行语法高亮。
lineNoStart: 1 # 代码行号的起始值。
lineNos: true # 是否在代码块中显示行号。
lineNumbersInTable: true # 是否在表格样式中显示行号。
tabWidth: 4 # 代码块中 Tab 的宽度(空格数)。
|
更多相关配置参见官网,例如网站字体配置、自定义页眉或页脚等。
撰写文章
在 你的站点名称/content/post 文件夹下新建文件夹,在新建文件夹中创建 index.md 文件,就代表创建一篇新文章了。
之后通过 VS Code 或其他编辑器,用 markdown 语言写文章。
在使用 hugo 命令生成的文章的最上面,都有一块被 +++ 或 — 包裹出来的区域,它的官方名称是 “Front matter”, 用以指定文章的各项属性。下面是我在 stack 主题的一篇示例文章中摘取的 Front Matter 片段,并写出了注释:
 1
 2
 3
 4
 5
 6
 7
 8
 9
10
11
12
13
14
15
16
17
18
19
| +++
author = "Hugo Authors" # 作者名称,用于标识文章的创作者。
title = "Markdown Syntax Guide" # 文章标题,将显示在页面和导航中。
date = "2019-03-11" # 文章的发布日期,用于排序和展示。
description = "Sample article showcasing basic Markdown syntax and formatting for HTML elements." # 文章的简短描述,通常用于摘要或 SEO。
tags = [
"markdown", # 文章的标签,用于分类和搜索。标签是灵活的,可以添加多个。
"css",
"html",
"themes",
]
categories = [
"themes", # 文章的类别,用于组织和过滤内容。每篇文章可以属于一个或多个类别。
"syntax",
]
series = ["Themes Guide"] # 文章系列,通常用于将相关文章组织在一起,例如教程或主题指南系列。
aliases = ["migrate-from-jekyl"] # 别名,用于创建文章的旧路径重定向到新路径。例如,当迁移文章时使用。
image = "pawel-czerwinski-8uZPynIu-rQ-unsplash.jpg" # 文章的封面图片路径,用于展示文章时的视觉效果。
+++
|
常用的Front Matter字段
- title :文章标题。自动生成的标题与文件名保持一致。
- date:文章创建日期。默认生成的日期为文件创建时的日期。
- lastmod:文章最后更新日期。
- description:文章简要描述,用于摘要或 SEO 优化。
- categories:文章分类。
- tags:文章标签。
- image:封面图片。
- draft:是否为草稿。如果设置为 true,Hugo 将不会编译该文件,文章也不会在页面中显示。
- hidden:是否隐藏文章。与 draft 的区别在于,设置为 true 的文章仍然存在,只是不会在页面中显示,但可以通过正确的网址访问。
配置 Nginx 发布 Hugo
配置 Nginx 发布 Hugo
1
| sudo nano /etc/nginx/sites-available/blog
|
不过我感觉nano并不好用,如果你用vscode连接远程服务器,可以用下面命令
1
| code /etc/nginx/sites-available/blog
|
下面内容里我都会用vscode编辑文件
示例内容
 1
 2
 3
 4
 5
 6
 7
 8
 9
10
11
| server {
listen 80;
server_name ren517.xyz www.ren517.xyz; # 改成你的域名
root /var/www/blog;
index index.html;
location / {
try_files $uri $uri/ /index.html;
}
}
|
启用并重启Nginx
1
2
3
| sudo ln -s /etc/nginx/sites-available/blog /etc/nginx/sites-enabled/
sudo nginx -t
sudo systemctl reload nginx
|
现在 Hugo 构建后的 public/ 目录内容将发布到 /var/www/blog。
1
2
3
4
5
| #!/bin/bash
cd /home/deploy/blog-source
hugo --minify
rsync -av --delete public/ /var/www/blog/
sudo systemctl reload nginx
|
现在打开你的域名,已经部署成功了。
接下来我会讲一些自动化的内容,如果不需要到这一步就可以结束了。
后面每一次添加了文件,只需要把上面命令跑一遍即可
部署脚本
在 /home/deploy/blog-source/ 创建:deploy.sh文件
里面添加以下内容
1
2
3
4
| cd /home/deploy/blog-source
hugo --minify
rsync -av --delete public/ /var/www/blog/
sudo systemctl reload nginx
|
给脚本权限:
到这一步就不需要上面每次都敲命令行了
直接 ./deploy.sh 就自动执行上面四条命令了
发布到GitHub
在GitHub上面创建仓库Blog(不要勾选README),复制SSH链接
在服务器上初始化并完成一些配置:
1
2
3
4
5
6
7
| git config --global user.name "Ren517"
git config --global user.email "你的邮箱"
git config --global init.defaultBranch main # 默认主分支叫 main
git config --global pull.rebase false # 避免 pull 警告
git config --global core.editor nano
|
在服务器上创建key:
1
| ssh-keygen -t ed25519 -C "blog-deploy"
|
然后一路回车到底
会生成两个文件
1
2
| ~/.ssh/id_ed25519
~/.ssh/id_ed25519.pub
|
查看公钥
1
| cat ~/.ssh/id_ed25519.pub
|
复制整行,类似ssh-ed25519 AAAAC3NzaC1lZDI1NTE5AAAAI....... blog-deploy
然后:
GitHub仓库 → Settings → Deploy keys → Add deploy key
添加公钥
测试
可以看到

第一次提交
1
2
| git init
git branch -M main
|
创建 .gitignore
写入
1
2
3
4
5
| public/
resources/
node_modules/
.DS_Store
.hugo_build.lock
|
解释
| 目录 | 原因 |
|---|
| public | build产物,不需要版本管理 |
| resources | Hugo缓存 |
| node_modules | npm依赖 |
| .hugo_build.lock | 构建锁文件 |
1
2
| git add .
git commit -m "Initial commit: Hugo blog setup"
|
连接仓库推送
1
| git remote add origin git@github.com:ren517/ren517-blog.git
|
1
| git push -u origin main
|
看到
1
2
| main -> main
branch 'main' set up to track 'origin/main'
|
就代表成功了
SSH配置
1.切换到deploy用户
1
2
| su - deploy
ssh-keygen -t ed25519 -C "github-actions-deploy"
|
2.将公钥加入 authorized_keys,允许免密 SSH:
1
2
3
| cat ~/.ssh/id_ed25519.pub >> ~/.ssh/authorized_keys
chmod 600 ~/.ssh/authorized_keys
chmod 700 ~/.ssh
|
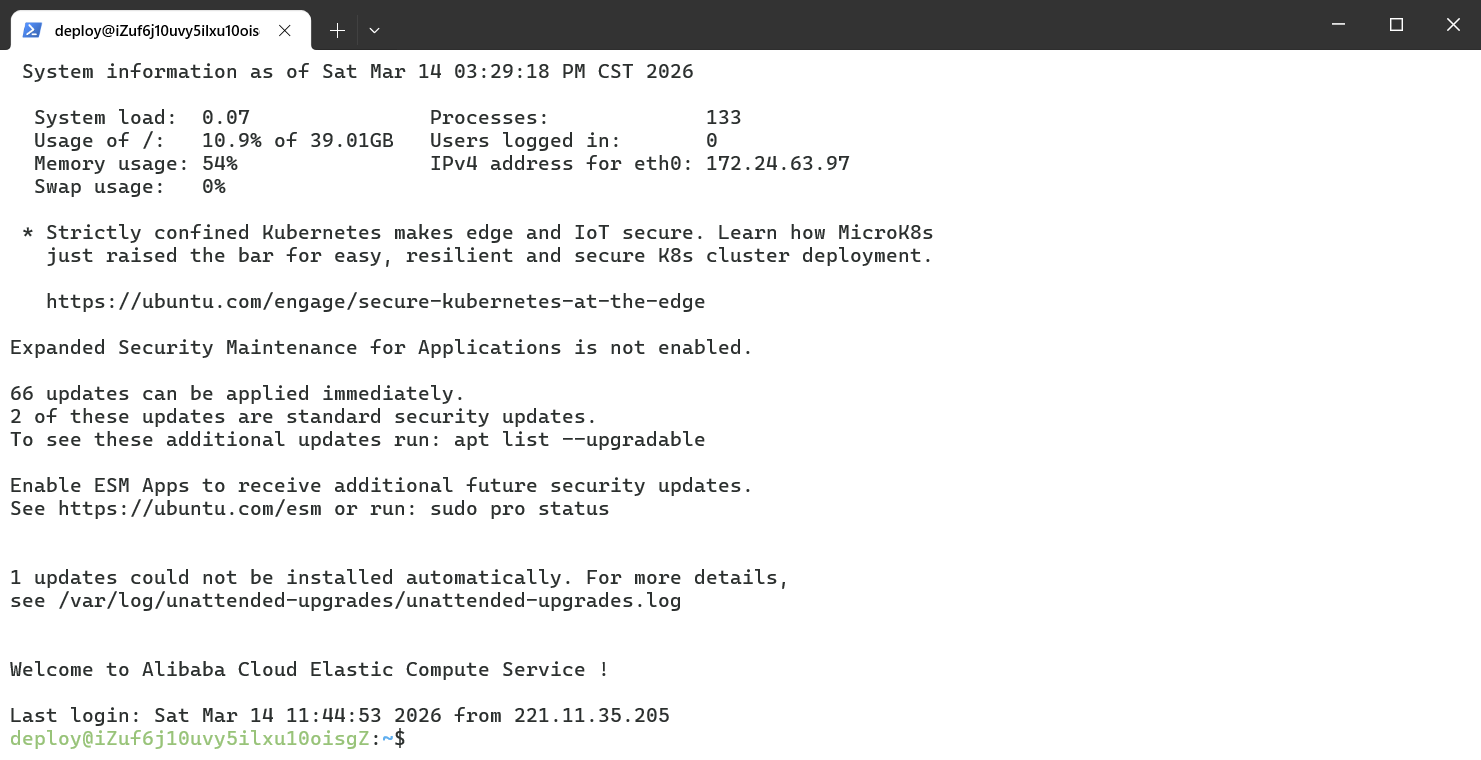
输出
1
2
| deploy@iZuf6j10uvy5ilxu10oisgZ:~/blog-source$ ls ~/.ssh
authorized_keys id_ed25519 id_ed25519.pub known_hosts known_hosts.old
|
把id_ed25519下载,移动到C:\Users\用户名字.ssh目录中
打开终端,测试免密登录
1
| ssh -i ~/.ssh/id_ed25519 deploy@139.196.39.87 # 换成你的服务器公共ip
|
这样即为成功
更改部署脚本
打开deploy.sh文件,修改成以下内容
 1
 2
 3
 4
 5
 6
 7
 8
 9
10
11
12
13
14
15
16
| #!/bin/bash
# 切到源码目录
cd /home/deploy/blog-source
# 拉取最新代码
git pull origin main
# 构建 Hugo
hugo --minify
# 同步到 Nginx发布目录
rsync -av --delete public/ /var/www/blog/
# 重新加载 Nginx
sudo systemctl reload nginx
|
给脚本加权限
GitHub Actions 自动部署
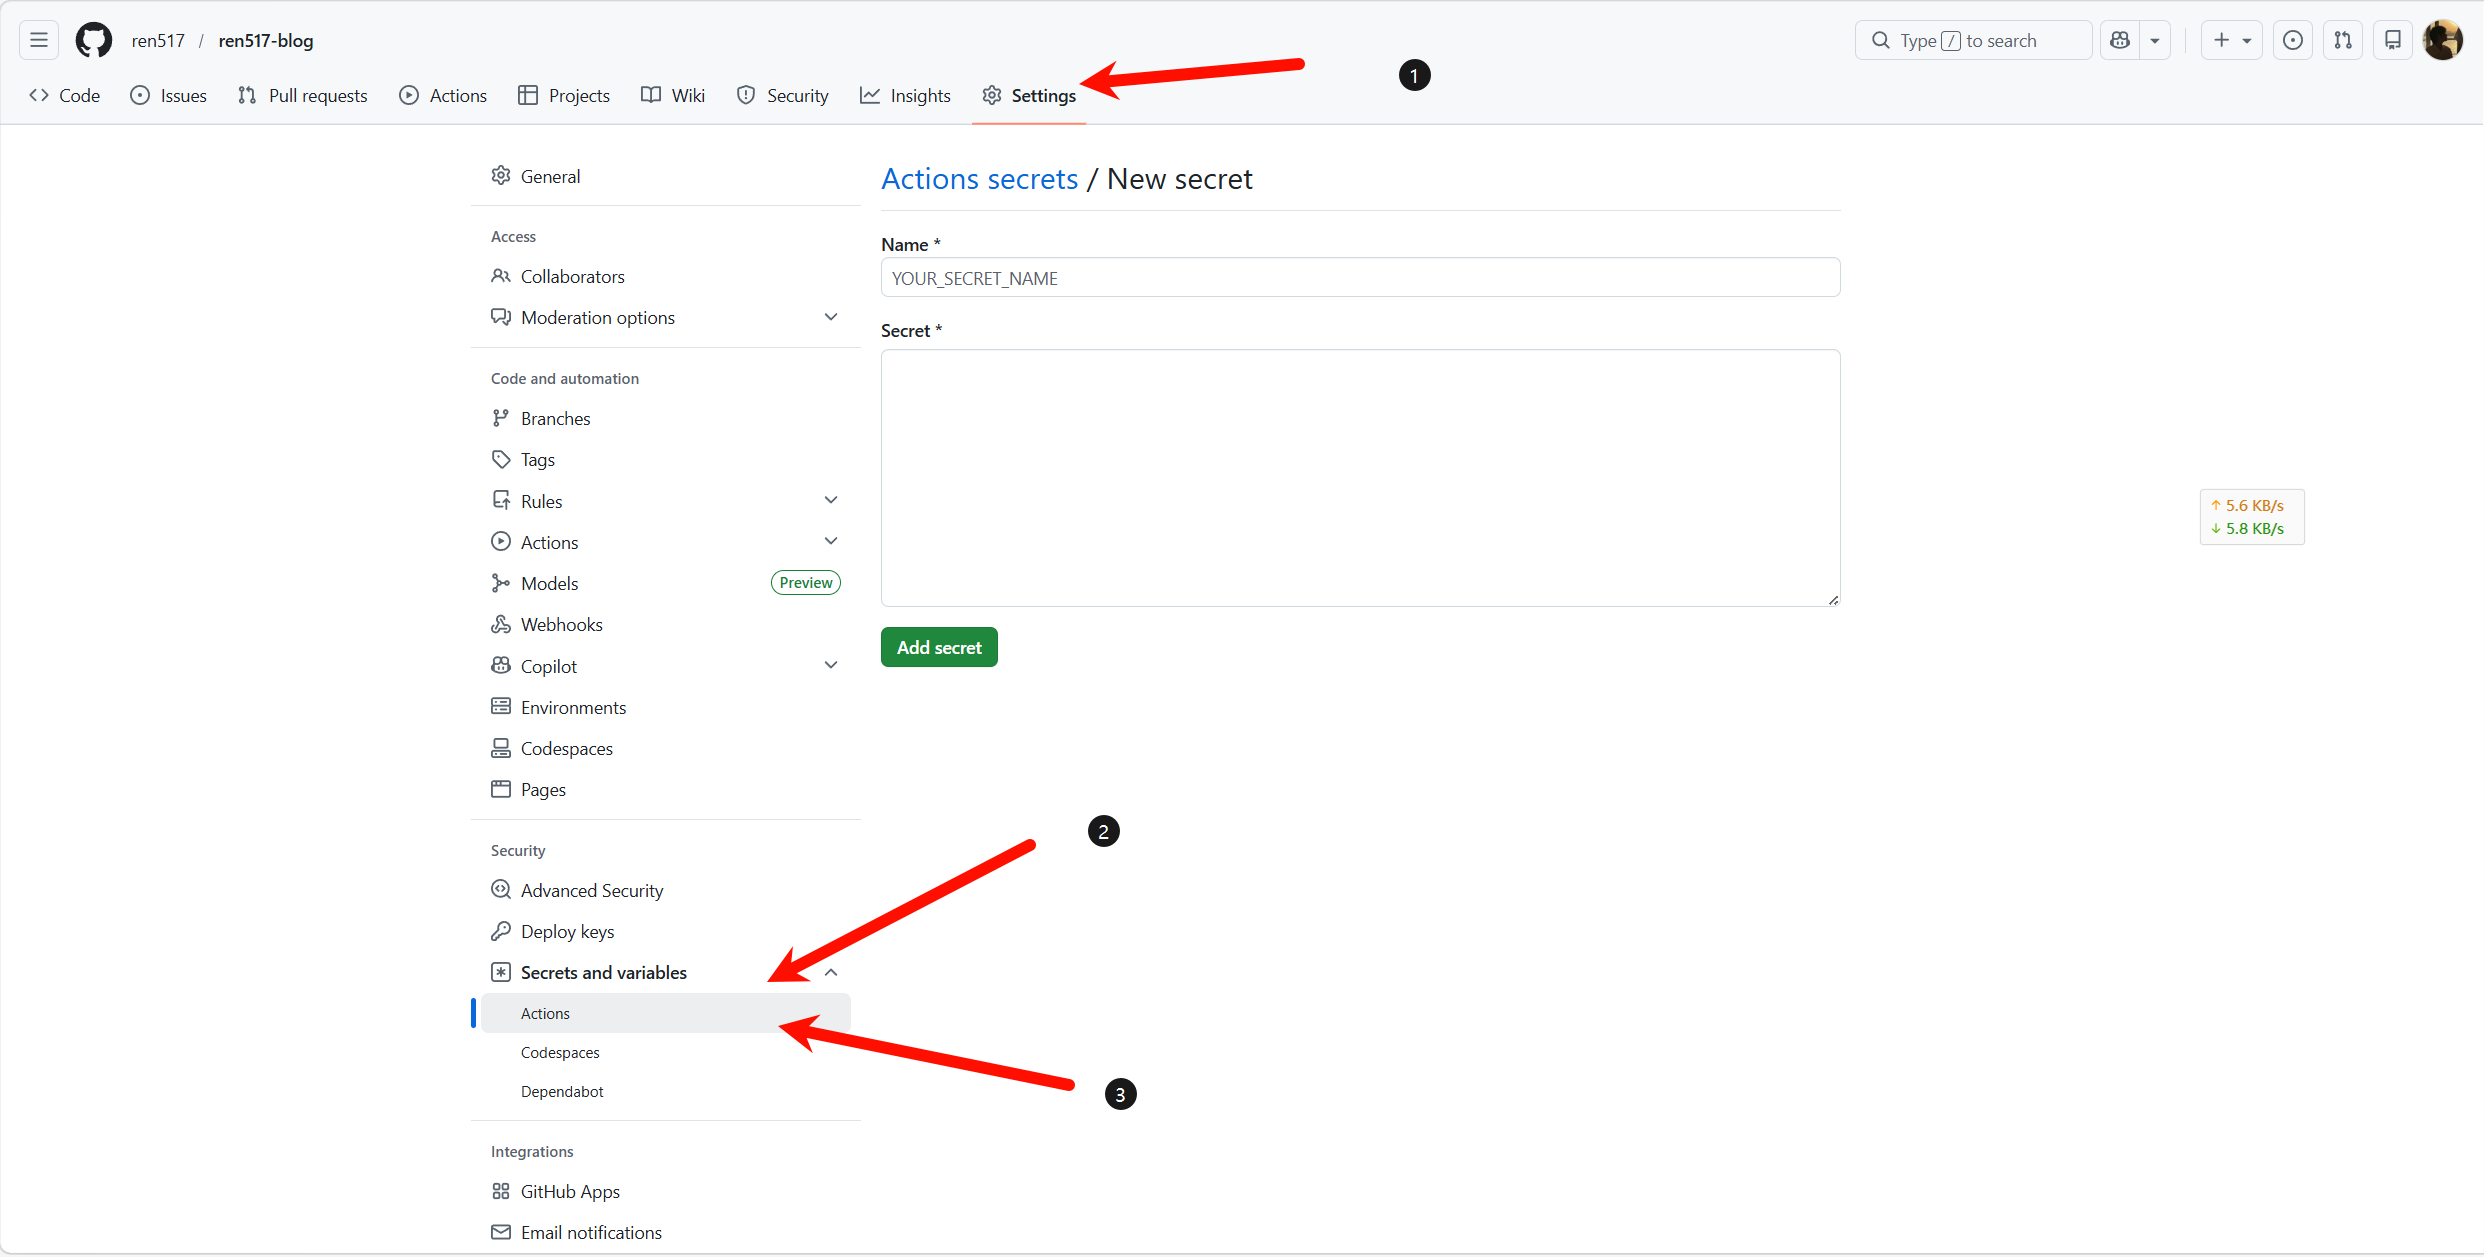
| Name * | Secret * |
|---|
| SERVER_HOST | 服务器 IP |
| SERVER_USER | deploy |
| SERVER_SSH_KEY | deploy 用户私钥(id_ed25519 内容) |
| 分为三个秘密,分别添加 | |
| 创建 workflow 文件 .github/workflows/deploy.yml: | |
| 内容 | |
 1
 2
 3
 4
 5
 6
 7
 8
 9
10
11
12
13
14
15
16
17
18
19
20
21
22
23
24
25
26
27
28
29
30
31
32
33
34
35
36
| name: Deploy Hugo Blog
on:
push:
branches:
- main
jobs:
build-and-deploy:
runs-on: ubuntu-latest
steps:
- name: Checkout code
uses: actions/checkout@v3
- name: Setup Hugo
uses: peaceiris/actions-hugo@v3
with:
hugo-version: '0.157.0'
- name: Build Hugo
run: hugo --minify
- name: Deploy to Server
uses: appleboy/ssh-action@v0.1.6
with:
host: ${{ secrets.SERVER_HOST }}
username: ${{ secrets.SERVER_USER }}
key: ${{ secrets.SERVER_SSH_KEY }}
port: 22
script: |
cd /home/deploy/blog-source
git pull origin main
hugo --minify
rsync -av --delete public/ /var/www/blog/
sudo systemctl reload nginx
|
提交workflow
1
2
3
| git add .github/workflows/deploy.yml
git commit -m "Add GitHub Actions auto-deploy workflow"
git push origin main
|
到这里就大功告成了
以后只需要
1
2
3
| git add .
git commit -m "写文章或修改博客"
git push
|
不需要再登入自己的服务器,就可以更改内容了
如果action挂了,手动紧急部署
1
2
| cd ~/blog-source
./deploy.sh
|
二更
发现了图片渲染的问题,如果直接用markdown语法
如果图片上面没有标题或代码块,会导致渲染问题
解决方案
1
2
| ---

|
加上一条分割线,成功解决
标题,代码块,—,图片上下都各空一行,减少渲染错误的情况